For nearly a year now, my RetroTINK-2X has been sitting on its stoup near the center of my media center gradually collecting dust on its exposed PCB. I applaud Mike Chi for putting together such a bombin’ device, but exterior looks were definitely not high on his to-do list.
That’s where 3D modeling and printing mastermind, Greg Collins, comes in. He’s been designing and putting together unofficial, high quality shells for neglected (but still very cool) modern retro gaming electronics. He’s been such an integral part of the RetroTINK product line that Mike and Greg officially teamed up to supply cases for the RGB2COMP Transcoder (and the new line of RAD2x cables as well?).
If I had one piece of advice when getting into the retro gaming scene, it’d be to join newsletters! Surprisingly, enthusiasts tend to use email newsletters as their go-to for the most recent information and source of exclusive deals. That’s how I made the jump to order one of Greg’s cases for the RetroTINK-2X.


Ain’t that purty? I decided to go for the classic “Ancient Gold”. It reminds me a lot of the Zelda I & II gold NES cases but with a really nice texture on top, something I’ve never seen before on a 3D printed model.
After removing the old acrylic top and bottom from my X2, putting on the new case was fairly simple. The only thing that was difficult was making sure that the buttons were aligned properly and had the right amount of tension on them. Though the case came with its own screws, one thing that bothered me was that it was expected for you to use the nuts that came with the original case rather than supplying its own. This wasn’t too much of a problem since I still had the old case, but I could see this being an issue for some people.

Before 
…and After! 
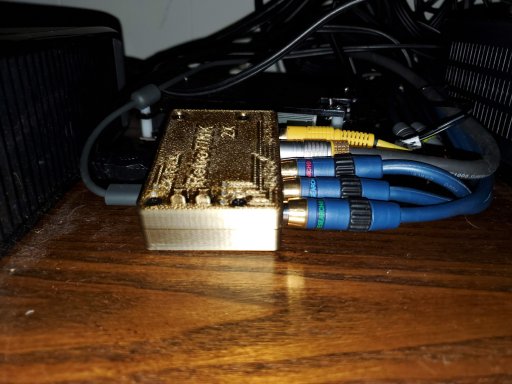
The case feels much more sturdy and put together than the original. In fact, I was pleasantly surprised by the build quality around the fragile micro-usb and mini-hdmi ports on the back. The unit altogether still doesn’t have a lot of weight to it, but at least I’m not concerned about humidity affecting the electronics as much.
One thing to note is that the case includes light pipes for the on-board LEDs to shine through, and they look great! That with the reasonably stable buttons makes the experience of changing the settings on the X2 enjoyable. Maybe now my girlfriend doesn’t have to worry as much about messing something up when trying to switch to component to play Super Mario World.
If you’d like to trick our your RetroTINK-X2 or get your hands on some other awesome 3D printed components, check out Greg Collins’ shop, Laser Bear Industries.